Thursday, 18 June 2015

Announcement!

I have been baking a lot. I have been posting photos of my creations a lot.

My apologies to my precious conspicuous blog that I had not gotten time to even write a post.

ANNOUNCEMENT! 

I have been posting a lot of photos of my recent cakes sold to a local restaurant which is in partnership with the hotel that I am working at. The respond has been great! My Instagram and Facebook have been getting recognition from friends and strangers!

The one respond that I got from a Youtuber got me shot right up into the ceiling!

YES! 
Lucasthevaliant is a Youtuber and he just commented on my macarons! He said they are perfect and he is VERY JEALOUS!

Link to his profile is here. > Luke's Instagram

These little things motivate me to push myself harder, invent new cakes, bake at least one cake almost everyday, take lots and lots of good food photos, share them through my Instagram and Facebook.

I want more.

I want to start catering for parties and perhaps make birthday cakes with special requests and all.

I want to be able to share my joy and passion for baking with others just so I can see that smile and awe in their faces when they first eat it with their eyes then their mouths.

With that, I would like to announce that I will be accepting orders from all of you to make ANY cakes for ANY events/functions.

You can contact me via my email at jesmund_foo@yahoo.com, OR send me a private message on Facebook.

My Facebook profile, click here: Jesmund Foo

Feel free to check out my conspicuous cakes posted in here! And please do, follow me! =D

My Instagram profile, click here: BlueCarnation


Be Conspicuous! <3

Monday, 11 May 2015

Be Conspicuous: Strawberry Shortcakes

Dear Honey Lemon, it is holiday season! All the more reason to Be Conspicuous!


A new Be Conspicuous chapter with Yigit Pura's fun cookbook, sweet alchemy: dessert magic!

There are some things in this recipe I cannot find in Ipoh, like the ground green cardamom. To be honest, I had never heard of cardamom, let alone know how it tastes like, not so sure about putting it in. Life went on without the ground green cardamom.

This cake is so much fun to work with. Let me start by saying I had had no previous experience nor the skills needed to make ANY of the pieces of the Strawberry Shortcake, except for the crème fraîche chantilly.

This cake requires a lot of preparations. The pieces can be prepared a day or days before, if you are busy working person.

Strawberry Shortcake has 3 different parts: crème fraîche shortcakes, crème fraîche chantilly and the pinot-noir strawberry sauce.

Crème Fraîche Shortcakes:

Making this shortcake is kind of like making scones. First I sifted the dry ingredients, the flour, salt and baking powder together, then combined crème fraîche, vanilla beans and orange zest in a separate bowl and left them aside.

Then I rubbed the chilled butter into the dry ingredients, just like how I did it with the scones and shortcrust pastry. So much fun to do it! I stopped when the mixture looked a bit like fine "Parmesan cheese".

Then I added the crème fraîche mixture into the a well I made with the "Parmesan cheese". I did not follow the instruction in the book, because it writes "Continue to stir until the batter is 75 percent combined" VERY ambiguous. So I just used what I knew, combining the wet and dry ingredient with a knife in a cutting motion until it formed a rough dough.

Yes, some dry flour and butter lined around the bowl, but really, it did not looked like it was the 25 percent left. Nonetheless, I floured the glass table in the kitchen lightly and just kneaded it ONCE! The dough was very sticky and I just added more flour and floured my palms and rubbed my hands until they fell off. I added the remaining flour and butter in the bowl, but it did not help, I kept on adding flour until the dough stopped sticking! Rolled the dough into a ball and cut them into half and patted lightly until they were flat on top and added more remaining flour and butter left in the bowl then stacked them together. Repeated this about 4 times.

It says here, "The secret is to not overwork the dough - be willing to walk away". And I did.

Wrapped the soft cutie with plastic wrap and let it chill in the refrigerator for about 1 and a half hour, though it says "at least 2 hours" OPPS! =P 

While waiting, I moved on to make the pinot-noir strawberry sauce.

Pinot-Noir Strawberry Sauce:

I might have forgotten to mention that I used Merlot instead of Pinot-Noir! =P

A kind cousin of mine has given us a Merlot some days ago, instead of buying a 1 litre Pinor-Noir for RM 69.90, I chose a free Merlot.

This was rather easy. I just put the orange zest, black peppercorns, vanilla beans and sugar into a bowl and started rubbing them. Playing with food using your own fingers is so much fun! It is not very often that one get to play with food, ENJOY IT WHILE YOU HAVE THE CHANCE! It seems that doing so will "release the fragrant essential oils into the sugar".

Then just poured the bottle of pinot-noir into the sugar mixture and stirred it a little, covered the bowl. Then cooked it on a water bath (bain-marie) on medium heat for 1 hour. DONE!

I must say I have cut out a lot of processes due to time constraint! LOL Whatever~

Then I got back to the crème fraîche shortcakes.

I used 2 sheets of baking paper and floured both sides of the dough and started rolling it into half inch thickness.

Not so fun BEAUTIFYING part! =[

I did not know how big I wanted my cake to be, so I started cutting triangles like how Yigit Pura said,  but HUMONGOUS triangles were what I created. I did not want to overwork with the dough, though it was not what it meant, overworking the dough, overall, I was just too lazy. =P

But I did cut out a trapezium shape, which I LOVE, along with 5 HUGE triangles. INTO THE OVEN THEY WENT!

Due to the size of my shortcakes, they had to be in the oven longer than what is written in the cookbook. Anyhow, they came out great! Crispy on the outside and tender on the inside! AWESOMENESS!
Freshly baked crème fraîche shortcakes!

I did not make the last part of the Strawberry Shortcake, the crème fraîche chantilly until I served them to my precious guests because chantilly just do not last long.

Crème Fraîche Chantilly:

Chantilly is always the easiest and the last thing to do. I just dumped in all the ingredients, whipping cream, sour cream and honey, and whipped for 5 seconds, literally. It did not require much whipping due to the presence of sour cream, which had already been whipped and added stabiliser. The chantilly was firm enough to work with.

I cut the trapezium-shaped crème fraîche shortcake horizontally using a serrated knife. A spoonful of the pinot-noir strawberry sauce, or in this case, merlot strawberry sauce was slowly dripped onto a small bowl. I then placed the bottom half of the cut crème fraîche shortcake on top of the merlot strawberry sauce and placed a strawberry with the stem chopped on the four corners of the crème fraîche shortcake.

Using a spoon, I scooped a quenelle of crème fraîche chantilly onto the middle of the crème fraîche shortcake, in between all the strawberries. Then covered the top with the crispy and sugary half of the cut crème fraîche shortcake. Lastly, dusted a bit of icing sugar on the top and DONE! It looks JUST LIKE THE ONE IN Yigit Pura's cookbook!

Tada! Awesome looking Strawberry Shortcake! 
Taste: (9/10) The Shortcake is not too sweet and it is very buttery with a bit of citrusy, it is very addictive! And soaking up the slightly sour strawberry sauce just makes it 10 times better! Though the cream could have been replaced with a sweeter one, I would take out the crème fraîche from the chantilly. Or else the sourness of this dish is just too much.

Look: (10/10) IT IS A 10 OUT OF 10! This looks exactly like it is in the cookbook!

All scores are based on the similarity of my attempt to duplicate the original creation by Yigit Pura. Feel free to leave your comments! XOXO

Thursday, 30 April 2015

Be Conspicuous: French Macarons

Dear Colourful Candy Bums, enjoy life and let us Be Conspicuous!


My macaron journey has been quite magical. Macaron fairies may have been there to sprinkle some fairy dusts and blessed my macarons and made sure they were there to see them grow stunningly beautiful holey feet! 

Let me bring you back to year 2012, the year where it all began. 

Before I started brewing macarons, I made sure I watched thousands of videos of people making the naughty, temperamental sweet devils. Each time I watched, it only made my urges to achieve what others have even stronger! I also read tonnes of articles about problems people encountered when giving lives to the devils. (Yes, they are wicked like THAT!)

With the immunity in mind, I, the ultimate magician, heated the cauldron and started beating the egg whites, the French way.


Basically, meringue making has 3 types: The French, the Italian and the Swiss way. 

The French way, by far, the easiest way, if you are planning to bake your meringue in the oven, go ahead and use this method. The French way requires no heating of any of the ingredients for the meringue. All you need to do is just whisk the stabilised egg white to soft peaks then add caster sugar gradually and whisk until firm peaks.

Stabilising egg white: It is recommended to use lemon juice or cream of tartar to stabilise egg white. As long as the pH is not 7 the egg white is stabilised and the peaks form is firm enough for folding later on.

The Italian way, slightly tricky. If you are planning to kill all the germs in the egg white and not letting it go into the oven, by all means, do it the Italian way. This requires heating up the sugar with water mixture, making a sugar syrup and slowly pour it into the beaten, soft-peaked egg whites. Pouring the hot sugar syrup into the egg white will slowly cook the egg white/ kill the bacteria, but not to the extend of making scrambled egg.

The Swiss way is not easy. It requires much skill and control of the heat. You beat the egg white on a bain-marie or a water bath. So, as you're beating the egg white, it is being cooked as well. It is said that the Swiss meringue has the most stable meringue.


Then, I so happily added liquid-based blue food colouring into the meringue and combined it well. It turned out to be a little to the cyan/turquoise colour! I was sad-mad!

Then I mingled in the almond flour + powdered/icing sugar into the meringue and slowly scraped the bottom of the bowl clockwise, while turning the bowl in the opposite direction. This process is crucial to the success of your macarons. Folding the the dry ingredients into the meringue (called macaronage) is to incorporate all the ingredients well, but the same time, not to beat all the air out.

You have just spent like half of the time earlier to beat air INTO the meringue and now you cannot just beat them all out again, right?

I folded until the macaronage reached the lava stage. It is a very ambiguous phrase. "Lava stage" What it means is that when you scrape up a part of the macaronage and let them slowly drop back into the bowl. Now, observe. See if the part that has dropped back into the bowl actually form the same layer as the macaronage that was left in there. If it still has multiple layers, it means your macaronage is still too thick and requires more folding. Do not worry if you did not get it right, this is the hardest and the most important step and requires practice! *cheers*
Here is how they looked when they came out of the oven, anything but round!

If you over-fold your macaronage, it will be very hard for you to handle or pipe later. Everything will flow like water and leave you with a sweet and colourful mess!

Next, it is all about piping! The first time I did it, nothing was round! Do not laugh when you see this!


My very first batch of macarons! <3
 Despite the shape of it, THEY HAVE FEET! THANK THE MACARON FAIRIES! <3

Then, I piped in the chocolate ganache and found them their partners and hamburger-ed them together!


Crispy on the outside, chewy on the inside. PERFECT! *dies*
Driven by my own little success, I kept on brewing more macaron babies the following dayS, using different food colouring, of course!

Second batch of pinkies! 

Third and forth and fifth, ALL IN DIFFERENT FLAVOURS!

Of course, my macaron journey has not been all magic and unicorns and rainbow and sunshine...
There were some batches that were cracked and no feet and then...

DISASTER! *sobs*
Nothing is sweeter than macaron disasters! *noms* *stuffs into friends' mouth*

Those were 2012. I did not just stop there. Even just a day before, I made some macarons, as well. And the recent ones are of course, much better looking than the ones in 2012. Today is 2015.

Baking, is indeed a constant experimentation. With macarons, it is sometimes about the weather, sometimes about the baking paper, the proportion of the ingredients, the ganache. Basically, if ONE thing goes wrong, your macarons will NOT look pretty.

Oreo Macarons for him!

Minty Dark Chocolate Macarons!

Black Sesame Macarons with fondant pierced tongue for a Halloween party!

More macaron shells!

Minty Dark Chocolate Macarons with cocoa powder sprinkled on top! 
The most recent macarons.
List of macarons made (as of 30th April 2015): 
  • Minty Dark Chocolate Ganache (The very best and the most made) 
  • Lemon Curd
  • Oreo Butter Cream
  • Black Sesame Butter Cream
  • Coconut White Chocolate Ganache
  • Green Tea, Matcha Butter Cream
I WILL NOT STOP HERE! THE LIST WILL GROW! 

Sunday, 19 April 2015

Be Conspicuous: Layered Crêpe Cake


AHA! It's time to Be Conspicuous again!

If you are new to my blog, I have started a journey to Be Conspicuous with Yigit Pura's cookbook, sweet alchemy: dessert magic.

I hate hate HATE to say this, but I failed to find the orange flower water here in Ipoh again! =[ I always try my best to make replicas of what is in the cookbook. *sighs* Anyhow, I proceeded without the orange flower water as mentioned in the book.

Let me just start by saying, THIS CAKE IS EASY BUT IT TOOK ME 3 HOURS!

This cake requires lots and lots of preparation until it is time for assembling everything together.

Crêpe cakes comprise of 2 distinguish layers, paper-thin crêpes and diplomat cream.


Paper-thin Crêpes:

Making the crêpes is a bit tricky and requires skills. First, I set both the eggs and the milk on the counter, just so they would come to room temperature. It seems that doing so would make the crêpes tender and not chewy.

While the mixture of eggs and milk were being left to room temperature, I prepared so many other things. The sugar, flour, salt and cornstarch were mixed together VERY WELL (I am sure), because I did the dumbest thing ever. I whisked the dry mixture as written in the instruction using a damn electric mixer. Then comes the work of cleaning and making sure that when I use the electric mixer next time, I would think about it first. You can mix the dry ingredients using your fingers OR just a normal something which you would not be needing in the steps to come. 

Next, we do not have handheld blender, so I just used an electric mixer to break the yolks and incorporate them into the milk. Tricky part, it says in the book, "It should become a thick, pale yellow, glossy liquid." What I got from using the electric mixer was just more bubbles. I mean... *whimpers*

I was so anxious that I had to stop the entire process and went to YouTube and watched how other people made they crêpes and stared skeptically at their batter. *bites nails*

I learned that I did not need to use an electric mixer, just a handheld whisk. Things started to look more normal, no bubbles! (HALLELUJAH! Sorry, Bubbles from Finding Nemo!) I added all the other necessary ingredients into it. I might have done something wrongly here and there because I did not get what is described in the cookbook, *sadface* The batter was not as thick as it was supposed to be.

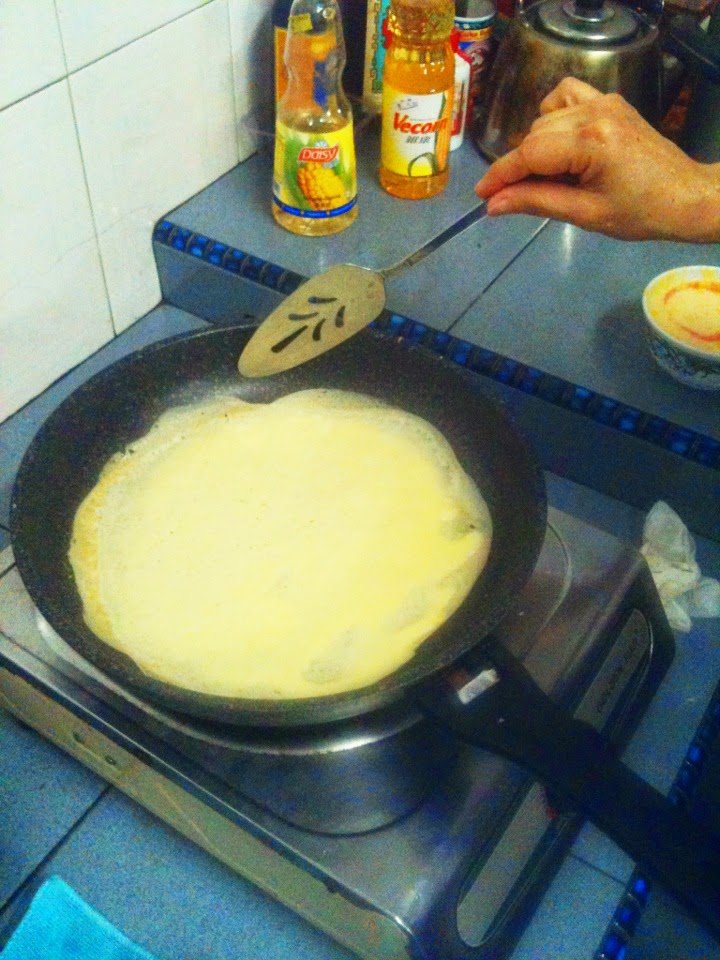
Worried as I was, I tried to make a crêpe anyways. I oiled the pan and ladled 60 ml of crêpe batter into the pan. Like I said, making crêpes requires skills. As of I, I did not have the skills. I failed the first crêpes, it turned out to be so soft that it could hold its shape and balled into a mess. I ran to my mum and asked for a rescue.

The second until the last crêpe were made by my mother. THANKS MAMA! =D


Please take note that if you do not have 3 hours or more (or less) to finish making an entire crêpe cake, feel free to keep the crêpes in a fridge. It is said that you just need to separate the crêpes with parchment papers and wrap them with plastic wrap.


Mama making the crêpes! 

Diplomat Cream:

In order to make diplomat cream, we need to have custard, first, or in this case, it is called pastry cream.

I have made custard before, for the banana chocolate mud pie, which is also another recipe by Yigit Pura and demonstrated it with humour and ease on Rachael Ray Show.

To make vanilla bean pastry cream, I scraped off the vanilla seeds and added both the seeds and the pods into the milk and brought the milk to a boil. Then, it is removed from the heat, covered and left aside for half an hour or so to allow the vanilla flavour to be infused into the milk.

Meanwhile again, I whisked together the sugar, egg yolks and cornstarch until it is smooth, ribbon-like. I brought the milk to a boil again, then pour them bit by bit into the yolks, while constantly whisking the mixture until it is a bit warm to my touch. This should temper the yolks and prevent them from scrambling later.

Then I added the egg and milk mixture back to the saucepan and cooked them, again, constantly stirring. At first I was using a whisk to stir, then I realised I had to use a wooden spatula, as fast as I could, I changed my tools and went back to stirring. You would not believe how fast they thickened! Good thing I did not spoil it. Quickly, I removed them from the heat and then kept on stirring until there was no lumps.

Since I did not have a handheld blender to emulsify the butter into the custard/ pastry cream. I just stirred the butter into the custard and it was smooth and awesomely sweet! This is how it would look when done right. *giggles*


Next is just all about whipping cream and adding in flavours. I grated some orange zest into the pastry cream and made some gelatin water. I should have added the orange flower water into the gelatin water, but I left out that part because no one is selling it here! Poured the gelatin water into the pastry cream then combined them well with a whisk.

Then I folded the pastry cream into the whipped cream and DONE! Diplomat cream is just THAT easy!


Love love LOVE this part, BEAUTIFYING!

Assembling the 2 parts together was not as easy. Again, it takes practice and patience to make a flat looking crêpe cake.

I placed a sheet of baking paper on the cake stand to prevent it from sticking to it. Starting with a layer of paper-thin crêpes then another layer of diplomat cream.


Things that went (not right) with my crêpe cake were:
  1. The paper-thin crêpes apparently, were not as THIN and even as they should have been. With mine rather thick in the middle, stacking them together as a cake would create a hump in the middle. 
  2. Spreading the diplomat cream could have been more even with a bit of patience and care! Pardon me, I was actually rushing because my family was waiting for me to go out for dinner! *whimpers*
  3. Generally, I could have been more patient because I was too excited to take photos of them while it was not fully set, yet. So it ran a bit out of place when I cut into it. It was like this:-

Trying to make it as nice as possible for photo-shooting! =P

Anyway, it is so much easier to cut into and place it on a plate to be served when it is fully set and there will be no mess! Strongly suggest to leave it overnight in the fridge. I left mine overnight and scroll back up to take a look at how beautiful and neat and clean it can be! =P

Taste: 9/10 (Really like the zesty flavour and the sweetness. Not to mention the texture of it, both chewy and creamy, LOVE!)
Looks: 8/10 (Could have been better if the cake was actually FLAT!)

All scores are based on the similarity of my attempt to duplicate the original creation by Yigit Pura. Feel free to leave your comments! XOXO


Thursday, 16 April 2015

Blue Hair

"Why would you dye your hair blue?" 

"Blue hair is ugly!"

"Why you so lala chai?" 
(If you have no idea what lala chai means, please educate yourself on the Urban Dictionary)

Some people are just too timid to show their hostility and felt like they needed to say something, so they make skeptical remarks and plant some doubts in your mind. 

Some people are just downright hostile and want to put their tongue on everything, leaving their utterly disgusting saliva scent on your mind. 

And there are the ones who are dumb and follow the existing social stereotypes created by the society, which categorises unique people into different classes and ranks, just like how they categorise eggs into Class A, B, C, D, E and F.

In no way, I could see how stereotypes can help anyone react faster to what is coming, based on someone else's experiences or their own. I would only feel the constant fear and anxiety if I were to conform to the stereotypes that I did not create. This will do nothing but create a barrier around me, prohibiting social contacts, which is what is happening right now. 

So now, question, do I look like a lala chai just because I have blue hair? Do not even let me tell you to "be the judge".

Yes, the thing on my head is blue. *grunts*

According to the Urban Dictionary, lala chai means "Typical Chinese male who have funky hairstyles, bell bottom pants which are bigger than 18" rims, collared shirts with dragon patterns and only speaks Cantonese. He has no clue how to speak English, and when he does, you won't understand anything"

I mean... SERIOUSLY? Is it large enough to slam it on peoples' faces? 

I am not denying that the first part is true but the ones after is just nonsense. I do not wear bell bottom pants. I do not wear collared shirts with dragon patterns. I speak Chinese, Malay, English AND Cantonese. UNLESS you cannot understand a word I am writing, STOP CALLING ME A LALA CHAI? *dammit*

Now hear it from me, you people out there who just know how to categorise other people. 

"I DYED MY HAIR BLUE BECAUSE I LOVE BLUE! I DO NOT CARE IF IT DOES NOT LOOK NATURAL AND IT LOOKS SMURFY! IT IS NOT LIKE YOUR BROWN OR BLONDE OR RED/BURGUNDY HAIR IS YOUR NATURAL HAIR COLOUR, DUH! EAT IT!"

One just simply cannot place a group of people or anyone at all into one category and infer that a person portrays a range of characteristics and abilities! One cannot know what anyone can or cannot do and their personalities unless one get to know him/her. 

This is just like the eggs you categorised to Class A, B, C, D, E and F, based on their freshness and their weight. You will never know if they are rotten and totally useless unless you break them open. 

"Because I love blue."

"You are fugly!" 

"Why you so ignorant?" 

Be Conspicuous: Pavlovas


My very first pavlova made for him, with love. <3

So I have followed the recipe on Yigit Pura's
cookbook, sweet alchemy: dessert magic. For all the dumb people out there who do not know who he is, please educate yourself! *winks*

It was supposed to be a french lavender pavlova. Due to whatever reasons, I could not find any lavender oil being sold in Ipoh, let alone some ORGANIC roses that can be eaten. I tried, people, I TRIED.

Apparently, there were lots of problems, I could not follow EXACTLY what the recipe tells. Yes, the eggs are at room temperature. The thing was preheating the oven. My oven can only go as low as 100°C. Substituted the white distilled vinegar with apple vinegar, just had to use whatever is in the house so I did not have to buy EVERYTHING *grins*, then added the food colouring into it. Thank goodness that I did not have to use baking paper anymore. The cutting and measuring is annoying. I had some silicon pats that were so generously bought and gifted to me OR my mother by my auntie. THANKS, SANDIA! <3

So I whisked the egg whites, lemon juice, to stabilise the egg whites until soft peaks, then gradually added the 200g of granulated sugar, WHICH I think is a bit too much. Next, the mixture of cornstarch and more sugar. (very ingenious, this will thicken the meringue, easier to work with) Seriously, the sugar needs to be reduced. I have let my family and friends and him tasted it. They all agree that it's a bit too sweet for them, even with the sweet tooth, it is a bit too much. I would strongly suggest anyone who is following the recipe, cut down on the sugar if you are not very fond of super-sweetness. Lastly, I put in the vinegarfood colouring mixture. Honestly, the colour wasn't dark enough, as meringue, they fade a lot when they are in the oven.

Meringue with firm peaks. Colour not clear enough, imo! *whimpers* 
 I just felt obliged to add in some flavours into the meringue itself, so I bought the yam flavouring and added into it. this is totally optional. If you have lavender oil, it is even better, I guess? I have not tried it. I apologize. =P 

Anyway, this is how it looks when it's done. Cute pointy lil' peaks! =D 


NOW, the most interesting part. BEAUTIFYING!

I did not expect the pavlovas in the recipe to be super minute. The last pavlova I made was the size of a humongous cake. I tried to separate the meringue into 5 parts, and piped them onto the silicon pads. I had to separate them into 2 baking sheets/trays. One more sad thing about it is that, my precious oven is small, too. I had to use like at least 4 HOURS to bake these 2 trays of pavlovas. *dies* 

Then I moved on to making the "two sloping hills with a valley in the middle", extracted from "Sweet Alchemy: Dessert Magic" page 77. I guess such techniques require lots of training. The things that are wrong about MY pavlovas are:- 

  1. Size, too huge for a spoon, to make the 2 hills and a valley. Not possible to just place a quenelle of chantilly on the pavlova and look elegant! =[
  2. Height, too high, pavlovas are delicate baked meringue, making it too high will only make it collapse when berries and chantilly are added on top of it.


BABIES IN THE OVEN! *cheers*

After an hour in the oven and rotating it 180 degrees and another 45 minutes in the oven, the pavlovas were done! (at least 3 of them were, that time) *break time* Another 2 hours, all of them were done by then. I just kept them in sealed containers until the next day.

Solely because I could not whip the cream and garnish all the pavlovas with raspberries and lychees and keep them in the refrigerator, waiting to be eaten by human mouths, because that would only create mushy pavlovas, and no one likes mushy pavlovas. I only whip the chantilly when human mouths decided that they wanted to eat them. 

So far, 3 of the pavlovas have already been eaten and people have given their comments to me! =D Take a look at it: 


My third pavlova, sprinkled a bit of poppy seeds on it. 

PS: I made some sweet butter when I was trying to whip some cream! *sadface* Interested? *smirks*

Taste : 8/10 (given by him)
Looks: 6/10 (could have been better, would look better with a more vibrant colour and with the size and the lack of crytalised rose petal)

All scores are based on the similarity of my attempt to duplicate the original creation by Yigit Pura. Feel free to leave your comments! XOXO

Tuesday, 14 April 2015

Sweet Alchemy

I had always had problems appreciating my very own presence. The only thing that stopped me from hurting myself was to look up to people of my kind. That was then.

I put my bet on a chef one day that he will win and I will be there to witness his growth.  He might not know I did that and I am still doing it now and he might not and will not even know who I am, but watching someone pursuing his passion and finally living his own dream can be very inspiring. Life, I bet with my life. 

He won the reality competition show. He opened his very own patisserie shop. He even wrote a book. When he first announced it on his Facebook page, although it was not my doing, I felt proud.

At that point, I felt like I had won the bet. My life got better ever since because I learned that things can get better. So, I let myself love and be loved. 

Now, I have someone that I love very dearly and be loved by him and I love those who do not love me, too. Hatred is not something I want to keep. I had hated myself too much. I know how tired it is to hate myself, let alone hating someone else. 

I was not working when the book was released, did not have the KACHING KACHING to buy it. I waited patiently. 

And now I am proud to say that I HAVE THE BOOK THAT YIGIT PURA WROTE!

On March 28, 2015, I ordered a copy from Amazon because sadly and regrettably, the official website of Tout Sweet Pâtisserie do not ship to Malaysia. 

To those dumb people who still do not know which book it is, please educate yourself. Link is below! 

SWEET ALCHEMY COOKBOOK

ANYWAYYYYY! Here is MY COPY OF THE COOKBOOK. Just showing off, you know! =D


Announcement! I have decided to make replicas of what is in this cookbook!

In fact, I have already bought all the ingredients needed to make the pavlovas! Will share when it is done and absolutely cute! 


YIGIT PLEASE READ THIS! 

"OH! Sorry to say, Yigit, if you are reading this, AHMEHGAHD, YOU ARE?!?!?!?!!? Erm.. I could not find any organic roses and lavender oil anywhere in Ipoh, the place I live in. *sobs* XOXO, Jesmund"